
Brewster's Drafting House Presents:
A 5-Step guide for homeowners new to the home design and building process
Step 1: Planning your Dream Home!

You’ve been collecting inspiration for years, and now you’re ready to turn your new house into the home of your dreams. The first step begins with your vision. Before construction can begin, however, you may need approval from your Homeowner’s Association, the city, your general contractor, or all of them, which typically requires properly prepared permit drawings.
This is where Brewster’s Drafting House comes in. Partnering with a professional who understands both your goals and the permitting process ensures your project starts on the right foundation. Step one is choosing a draftsman or architect who can translate your vision into accurate 2D plans, and even 3D renderings to guide the next stages of design and construction.
Step 2: Finalizing the Design
Step #2 is where your vision begins to take shape on paper. Working closely with your draftsman or architect, this stage produces the essential drawings and documents that communicate your project’s intent to everyone involved. These plans form the foundation for permitting, engineering, and eventual construction.
Typical Timeline: This step generally takes 3–6 weeks to complete, depending on the project’s complexity and the number of revisions required. Collaboration is key during this stage, as your inspiration photos, notes, and goals are carefully translated into a design that fits your property and lifestyle.
Key Milestones in Step #2:
- Site Verification: Even when existing blueprints are available, professionals verify site conditions firsthand to ensure accuracy before moving forward.
- AS-BUILT Creation: Verified measurements, photos, and existing drawings are imported into BIM software to produce accurate scaled floor plans.
- New Design Development: Using your input, the draftsman creates proposed floor plans and integrates desired design elements into the existing or new structure.
- Design Refinement: After reviewing proposed plans and any 3D renderings or walkthroughs, you’ll meet with your draftsman to refine details, explore options, address challenges, and finalize a design that truly reflects your vision.
Checklist for Step #2:
- Completed 2D & 3D design documents for construction plans
- DWG files prepared for coordination with engineers
Step 3: Engineering and Bids
Step #3 begins once you’re ready to obtain bids for the design you’ve developed with your draftsman. With finalized architectural plans in hand, the focus shifts to engineering, a critical step in preparing your project for permitting and construction.
Typical Timeline: Engineering timelines vary depending on project complexity, but most designs take approximately 3–4 weeks to complete. More intricate homes or structural requirements may extend this timeframe.
Your Options in Step #3:
- Option 1 – Contractor Estimates First: You can begin meeting with general contractors to discuss your project and gather preliminary estimates. While contractors often prefer engineered plans for precise bids, this option helps you identify professionals you’d like to work with early on.
- Option 2 – Engineering First: You may choose to work directly with an engineering firm; either one recommended by your draftsman, or one you select. Your draftsman will provide engineers with CAD files (.dwg), which can be used in AutoCAD or similar programs to produce the structural engineering drawings required for city permit submittals. This step is usually an additional cost, with fees and scope varying by project.
Ultimately, both paths lead to engineering, but completing engineering first allows contractors to provide highly accurate, line-by-line bids, reducing surprises later in the process.
Checklist for Step #3:
- Select a structural engineer and general contractor
- Structural engineering pages completed
- Title 24 compliance and structural calculations prepared
Step 4: City Permits
Step #4 begins once your draftsman and structural engineer have completed all required documentation, and you’ve selected the contractor who will oversee construction. At this stage, you’ll have a full set of materials ready for permit submittal, including:
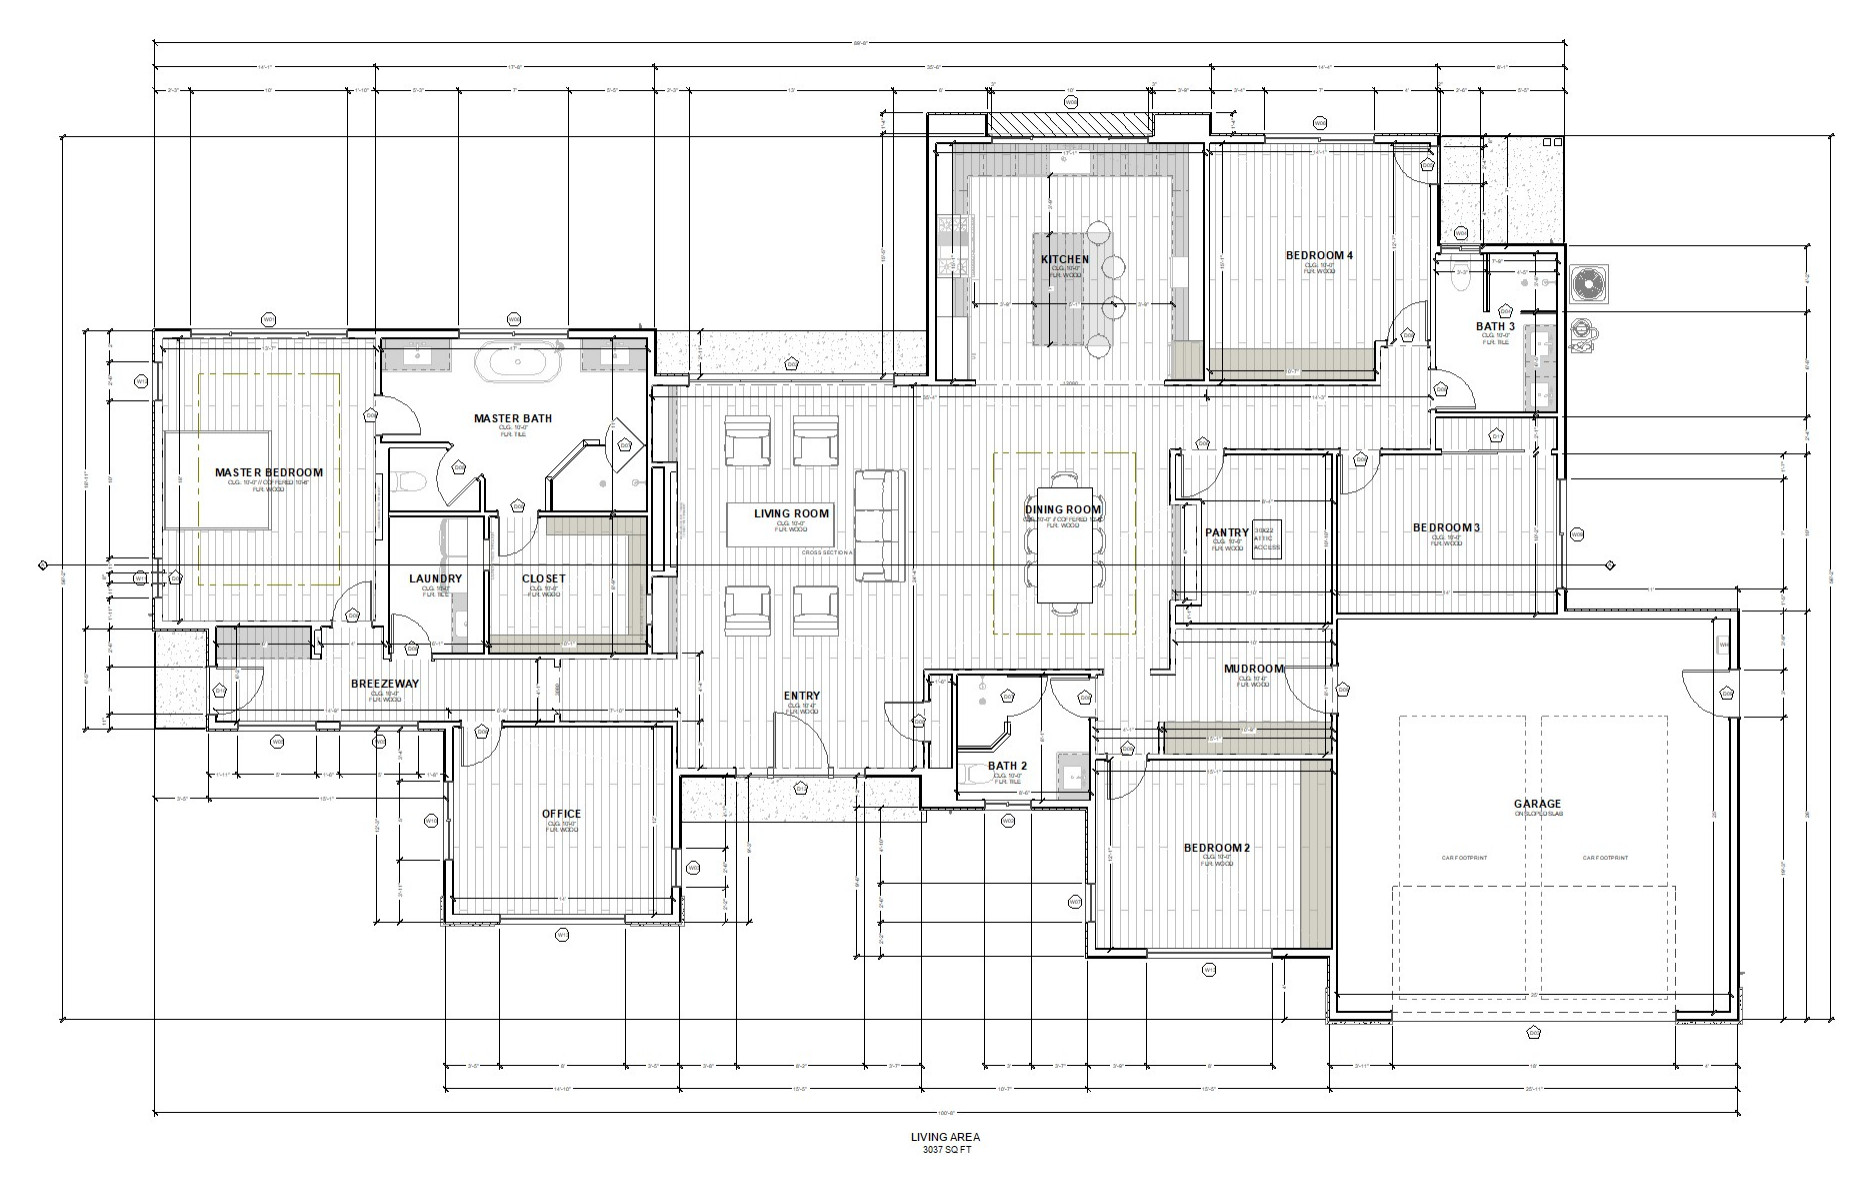
- Architectural Sheets (A-Sheets): Typically scaled at 24" x 36", these include the site plan, general building notes, CalGreen notes, existing and proposed floor plans, elevations, cross sections, electrical and plumbing layouts, and roof plan.
- Structural Engineering Sheets (S-Sheets): Also scaled at 24" x 36", these detail the foundation plan, framing plan, structural details, StrongWall, HardyFrame, and other required structural components.
- Title 24 Compliance: Required in California, this energy report demonstrates compliance with state energy standards. It is often provided by your engineering firm, but can also be completed online once architectural and structural plans are finalized.
- Structural Calculations: Typically prepared as an 8 ½" x 11" packet, these documents accompany your engineering sheets for submission.
- Optional Items (as required): Depending on the city and property conditions, you may also need civil engineering, grading plans, surveys, or other geotechnical documents.
Typical Timeline: At this point, the process is primarily in the hands of your local city’s Planning and Building Department. Each city has its own review timelines, which they will share after your first submission.
What to Expect: Permit requirements vary by jurisdiction. Most city planning departments provide checklists outlining exactly what is needed for submittal, which can be found on their website or obtained directly at the planning counter. Having all documents prepared accurately and completely helps ensure a smoother review process and reduces the likelihood of costly delays.
Step 5: Build to Completion!
Step #5 begins once your permits have been approved, congratulations! This is the exciting stage where your project officially moves into construction.
Typical Timeline: The schedule for this phase is determined by your chosen general contractor. Timelines can be confirmed directly with them based on availability, scope, and project complexity.
What to Expect: With permits in place and plans finalized, construction begins under the guidance of your general contractor and their team of subcontractors. This is where your design comes to life. While this stage involves many moving parts, your contractor will manage the process, coordinate trades, and ensure the work aligns with your approved plans. At this point, the homeowner and contractor work closely together to bring the vision into reality.